MCP Authentication / Authorization
In the previous section we covered the development of an MCP Server. In this section we shall extend the server code so that it supports authentication / authorization.
Objectives
Authentication and authorization are essential for both the MCP service provider and the user. Each party must be able to verify the identity of the other to establish trust and enforce appropriate access controls.
From the MCP Server's perspective, it may be necessary to authenticate and identify the user. This enables the server to apply role-based access controls and enforce policies based on various user attributes - such as identity, role, or organizational affiliation.
From the MCP client's perspective, it is equally important to authenticate the service. Users must be confident they connecting to a trusted and verified service endpoint.
Authentication / Authorization flow
In our example setup, the following components participate in the authentication and authorization process:
-
Microsoft Entra acts as the OAuth 2.1 Authorization Server, issuing access tokens to authenticated users.
-
Visual Studio Code hosts the MCP Client, functioning as the OAuth 2.1 client.
-
The ColorsMCP server is the OAuth 2.1 protected resource server, validating access tokens presented by the client. If a request lacks a valid token - maybe due to it being missing, invalid content, or expired - the server responds with an HTTP 401 Unauthorized status.
Should a 401 be returned, the MCP Client queries an endpoint at the URL ./well-known/oauth-protected-resource to retrieve information needed for authentication - this includes the address of the Entra tenant. The flow redirects the user to Entra, where they are prompted to authenticate. Upon successful authentication, the MCP Client receives an access token, which it attaches to a retry of the original request to the MCP Server. The MCP Server then validates the token - if it is valid, access is granted; otherwise, the process repeats.
As part of the authentication process, the user is shown a consent screen detailing what information will be shared and what permissions the application is requesting. The user can choose whether to proceed. In enterprise environments, administrators may grant consent on behalf of all users in the organization.
The access token follows the JWT (JSON Web Token) standard. It is a cryptographically signed string that contains information (claims) about the user's identity and, typically, their access permissions (such as roles or scopes). The signature ensures the token's integrity - proving it was issued by Entra and preventing forgery. You can learn more at https://jwt.io/introduction.
Colors MCP Server
The source code to the ColorsMCP server is at : https://github.com/markharrison/ColorsMCP
The original version of ColorsMCP is in the project:
- ColorsMCP-HTTP
Using this as the starting point, the following project includes additional authentication/authorization logic:
- ColorsMCP-HTTP-Auth
As before, most of the heavy lifting is done by the MCP C# SDK.
ColorsMCP-HTTP-Auth
Check program.cs and compare to the original.
The following configuration values are required to support authentication and authorization:
-
ServerUrl– The URL of the MCP Server. This is the endpoint to which the MCP Client sends requests. -
TenantId– This value uniquely identifies the Entra tenant that belongs to us and manages the users for authentication and token issuance. Since many organizations use Microsoft Entra ID, it’s necessary to distinguish our tenant from others. -
Audience– The identifier of the MCP Server, the intended recipient of the access token. This ensures the MCP Server only accepts tokens meant for it. -
Scope– Specifies the permissions or access rights requested by the client. Scopes define what the client can do once authorized, such as reading data or accessing specific API features.
 var builder = WebApplication.CreateBuilder(args);

 var serverUrl = builder.Configuration["ServerUrl"] ?? "";
 var tenantId = builder.Configuration["TenantId"] ?? "";
 var audience = builder.Configuration["Audience"] ?? "";
 var scope = builder.Configuration["Scope"] ?? "";
 var oAuthServerUrl = $"https://login.microsoftonline.com/{tenantId}/v2.0";
The following code adds the authentication / authorization rules.
AddAuthenticationdefines the authentication scheme
 builder.Services
     .AddAuthentication(options =>
         {
             options.DefaultChallengeScheme = McpAuthenticationDefaults.AuthenticationScheme;
             options.DefaultAuthenticateScheme = JwtBearerDefaults.AuthenticationScheme;
         })
AddJwtBearersets the rules used to validate the JWT access token. It also includes event handlers for token validation success and failure.
     .AddJwtBearer(options =>
         {
             options.Authority = oAuthServerUrl;
             options.TokenValidationParameters =
                                new Microsoft.IdentityModel.Tokens.TokenValidationParameters
             {
                 ValidateIssuer = true,
                 ValidateAudience = true,
                 ValidateLifetime = true,
                 ValidateIssuerSigningKey = true,
                 ValidAudience = $"api://{audience}",
                 ValidIssuers = new[]
                 {
                     oAuthServerUrl,
                     $"https://sts.windows.net/{tenantId}/",
                 },
                 NameClaimType = "name",
                 RoleClaimType = "roles"
             };

             options.MetadataAddress = $"{oAuthServerUrl}/.well-known/openid-configuration";

             options.Events = new JwtBearerEvents
             {
                 OnTokenValidated = context =>
                 {
                     var name = context.Principal?.Identity?.Name ?? "unknown";
                     var upn = context.Principal?.FindFirstValue(
                            "http://schemas.xmlsoap.org/ws/2005/05/identity/claims/upn") ?? "unknown";
                     Console.ForegroundColor = ConsoleColor.Yellow;
                     Console.WriteLine($"Token validated for: {name} ({upn})");
                     Console.ResetColor();
                     return Task.CompletedTask;
                 },
                 OnAuthenticationFailed = context =>
                 {
                     Console.ForegroundColor = ConsoleColor.Red;
                     Console.WriteLine($"Authentication failed: {context.Exception.Message}");
                     Console.ResetColor();
                     return Task.CompletedTask;
                 }
             };
         })
AddMcplogic defines theResourceMetadata- this is information retrieved from the./well-known/oauth-protected-resourceendpoint. It includes the address of the Entra authentication service.
     .AddMcp(options =>
     {
         options.ResourceMetadata = new()
         {
             Resource = new Uri(serverUrl),
             ResourceDocumentation = new Uri("https://github.com/markharrison/colorsmcp"),
             AuthorizationServers = { new Uri(oAuthServerUrl) },
             ScopesSupported = [$"api://{audience}/{scope}"],
         };

     });
builder.Services.AddAuthorization();
The remainder of code is similar to before - just injecting UseAuthentication / UseAuthorization into the execution pipeline.
builder.Services
.AddMcpServer()
.WithHttpTransport()
.WithTools<ColorsTools>();
builder.Services.AddCors(options =>
{
options.AddDefaultPolicy(policy =>
{
policy.AllowAnyOrigin()
.AllowAnyHeader()
.AllowAnyMethod();
});
});
builder.Services.AddSingleton<ColorsService>();
var app = builder.Build();
var colorsService = app.Services.GetRequiredService<ColorsService>();
app.UseAuthentication();
app.UseAuthorization();
app.UseCors();
app.MapMcp().RequireAuthorization();
app.MapGet("/health", () => "Healthy");
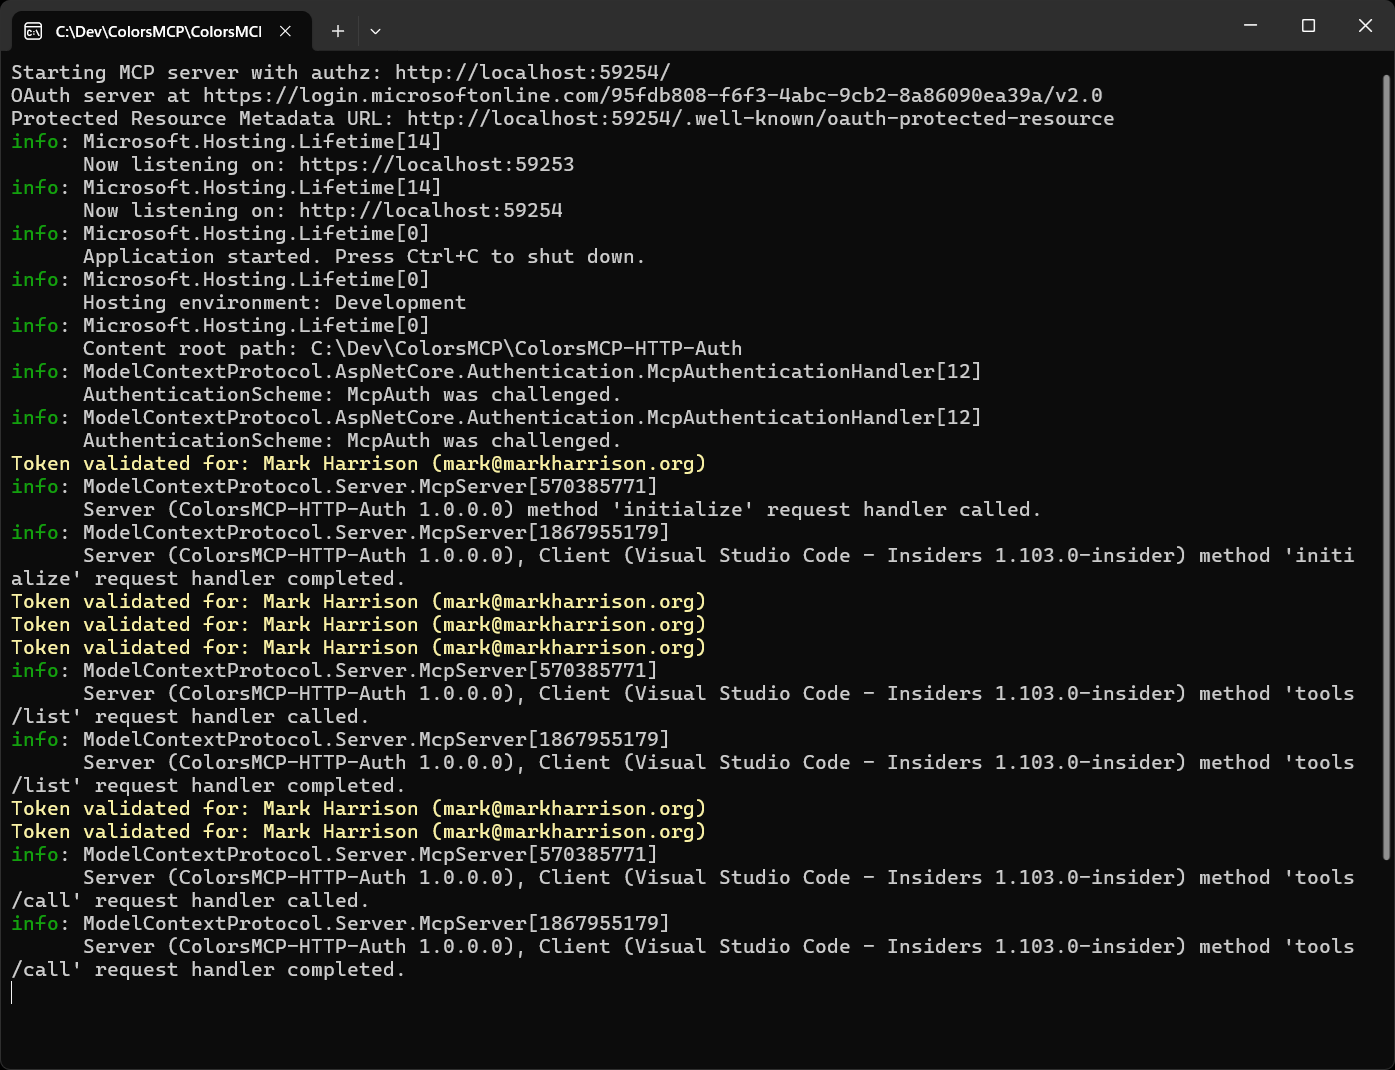
Console.WriteLine($"Starting MCP server with authz: {serverUrl}");
Console.WriteLine($"OAuth server at {oAuthServerUrl}");
Console.WriteLine($"Protected Resource Metadata URL: {serverUrl}.well-known/oauth-protected-resource");
app.Run();
Configuring Microsoft Entra
To enable secure access, we need to create an App Registration in Microsoft Entra for the ColorsMCP server. This registration represents the resource server in the OAuth 2.1 flow and will be used to:
-
Define the scopes (permissions) that clients must request to access protected MCP resources.
-
Establish a unique Application (Client) ID that identifies the ColorsMCP server.
-
Configure Entra to issue access tokens that the MCP Clients present when calling the ColorsMCP server. These tokens allow the server to validate and authorize incoming API requests based on the token integrity and assigned scopes.
Create MCP Server App Registration
-
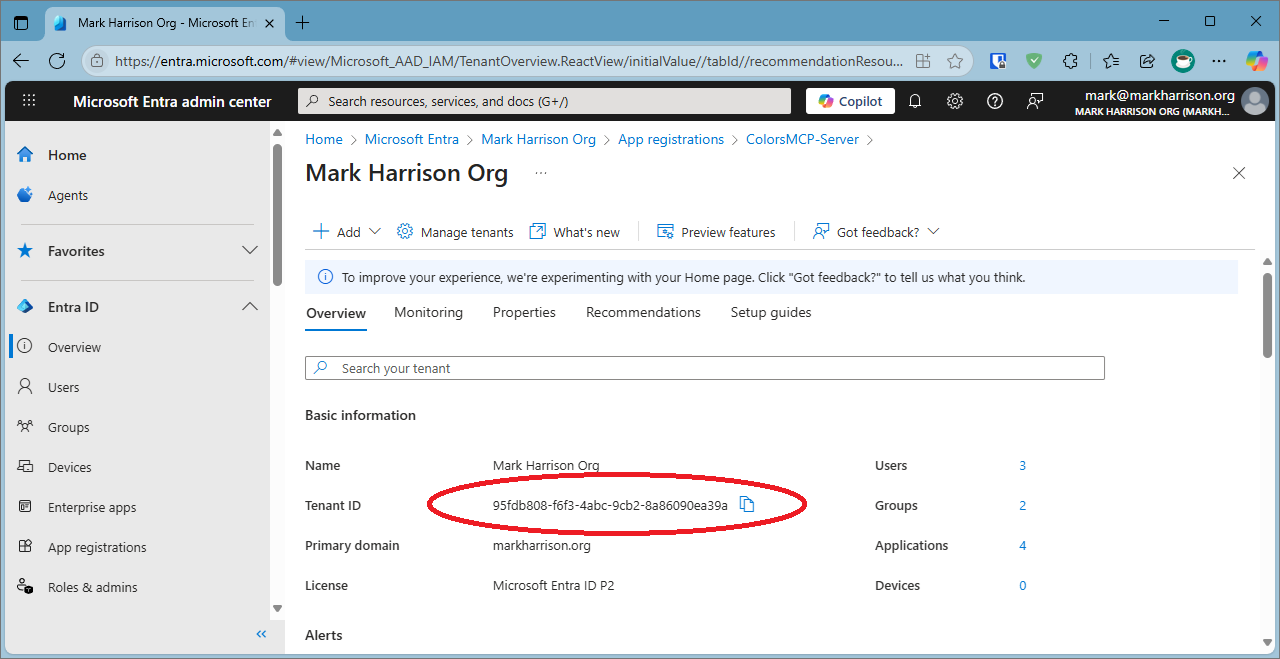
Note the Tenant Id - this will be needed for application configuration.
-
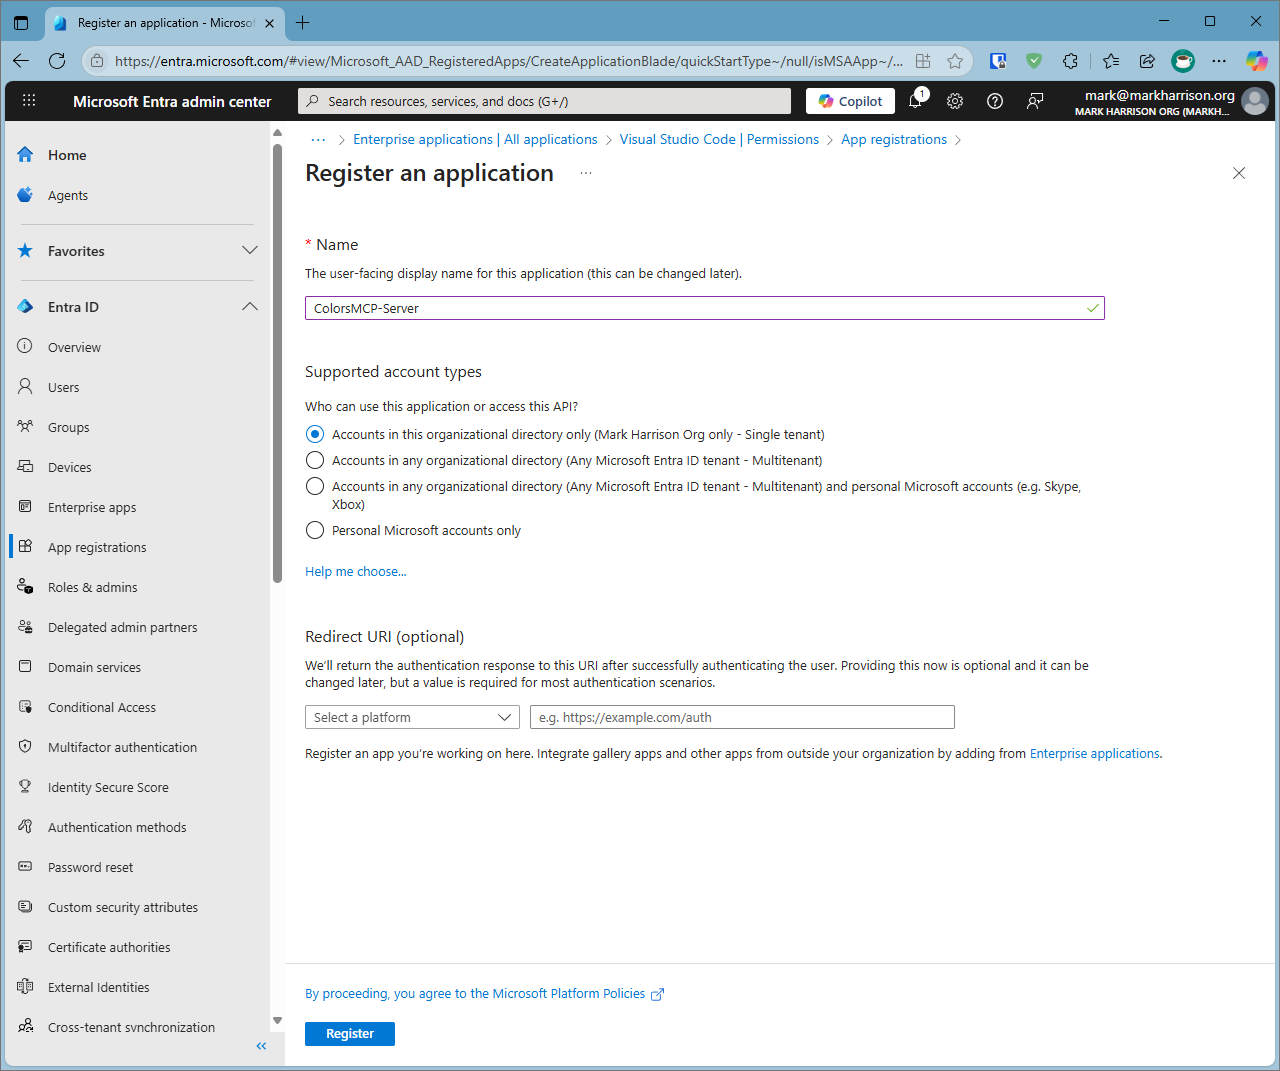
Using Left Hand menu select
Entra ID|App registrations -
Select
New Registration -
Enter a name e.g. ColorsMCP-Server
-
Select
Register
-
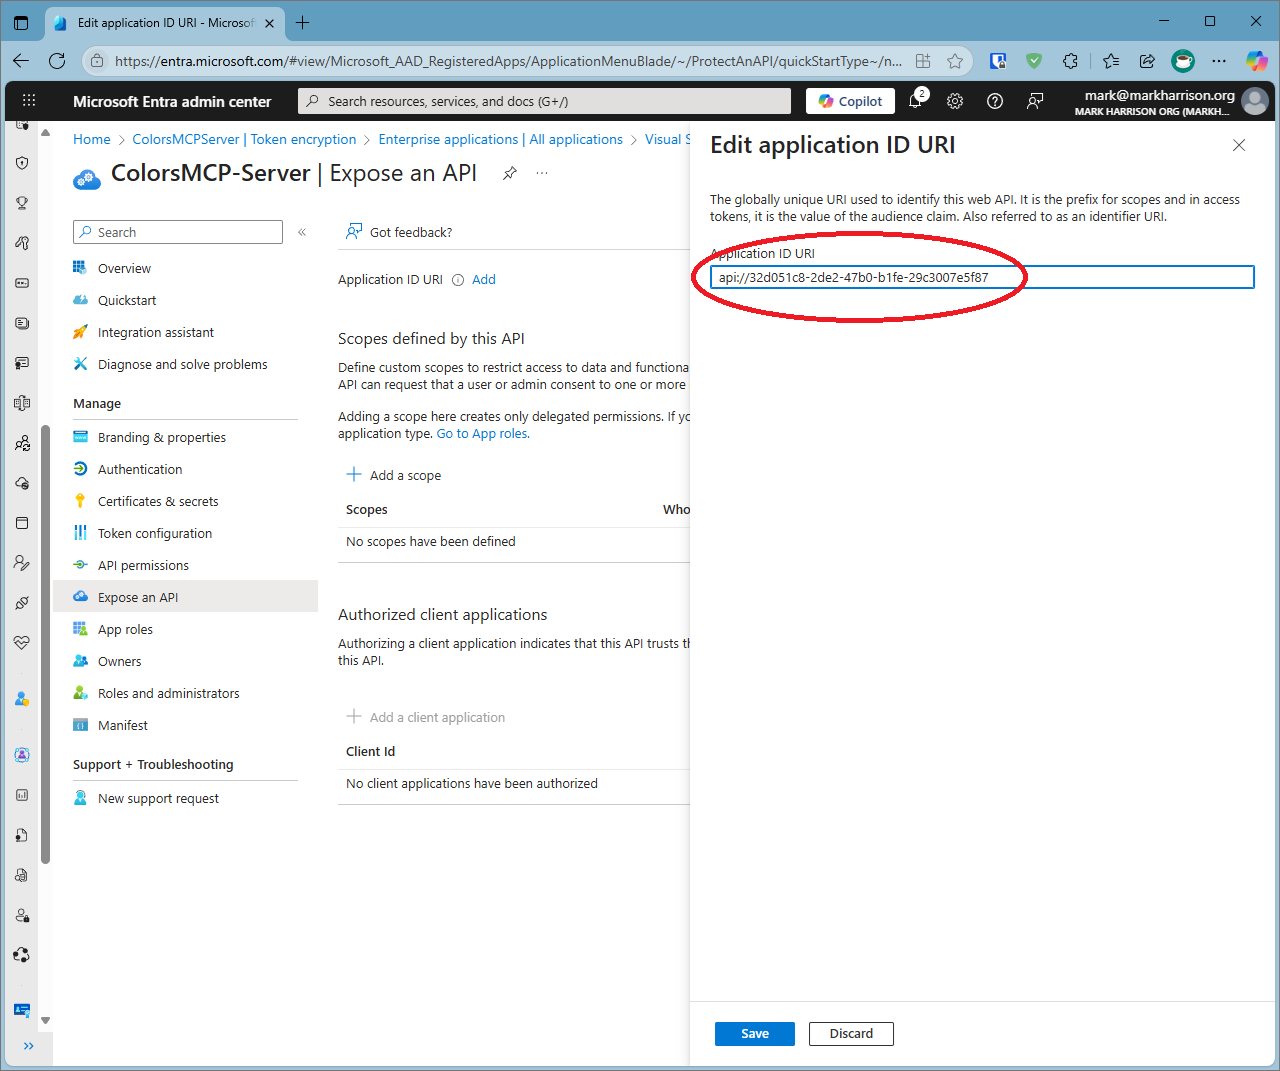
Using menu blade, select
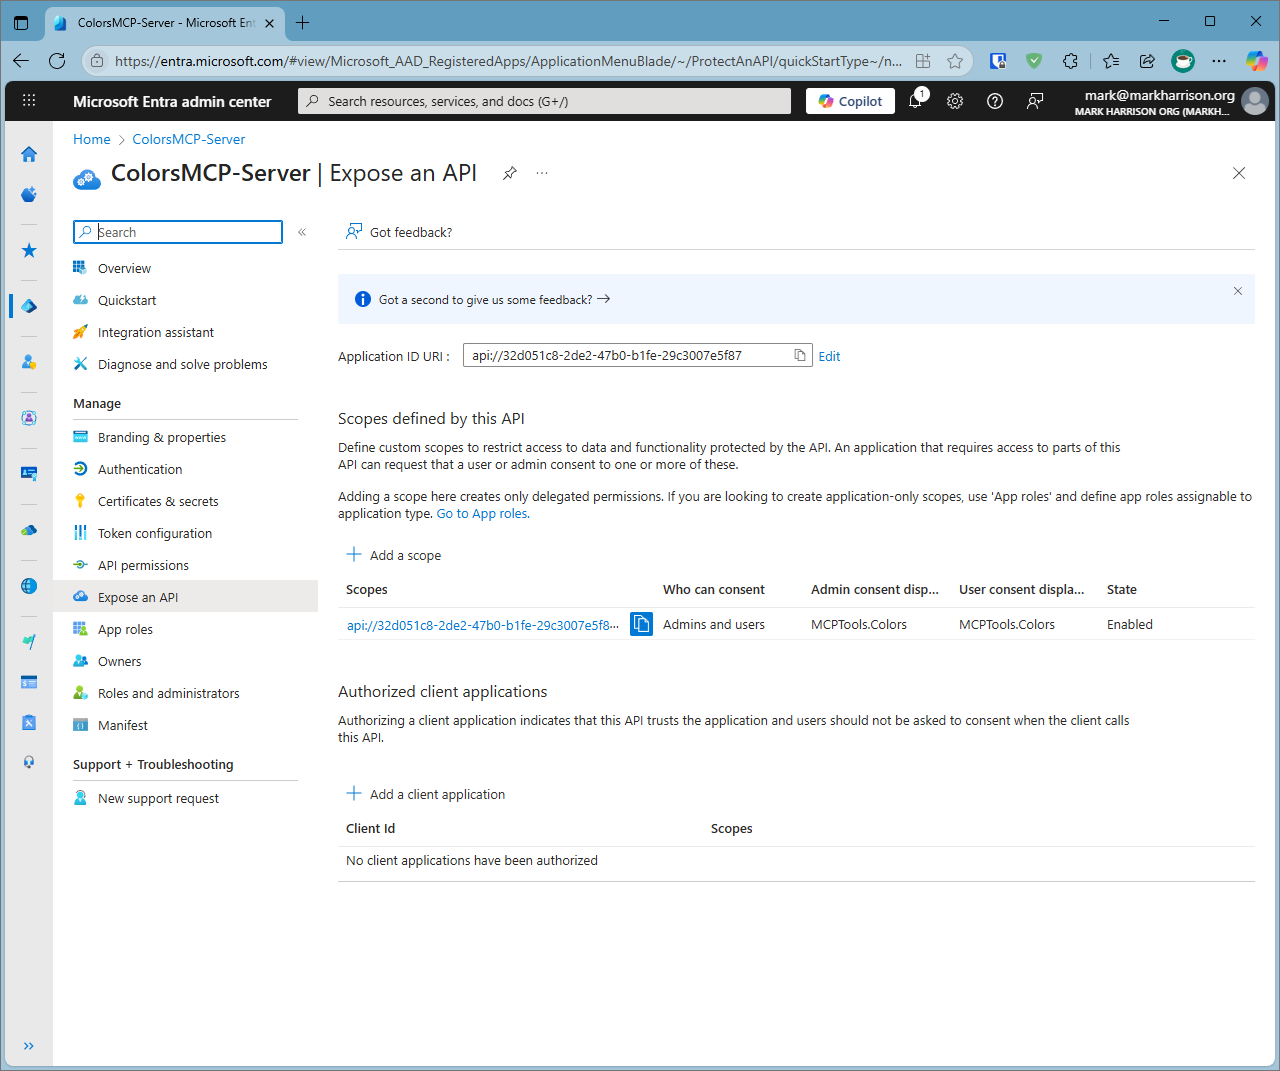
Manage|Expose an API -
Create Application Id - click
Addto create a unique id. Note the number created, it will be needed for our application configuration
-
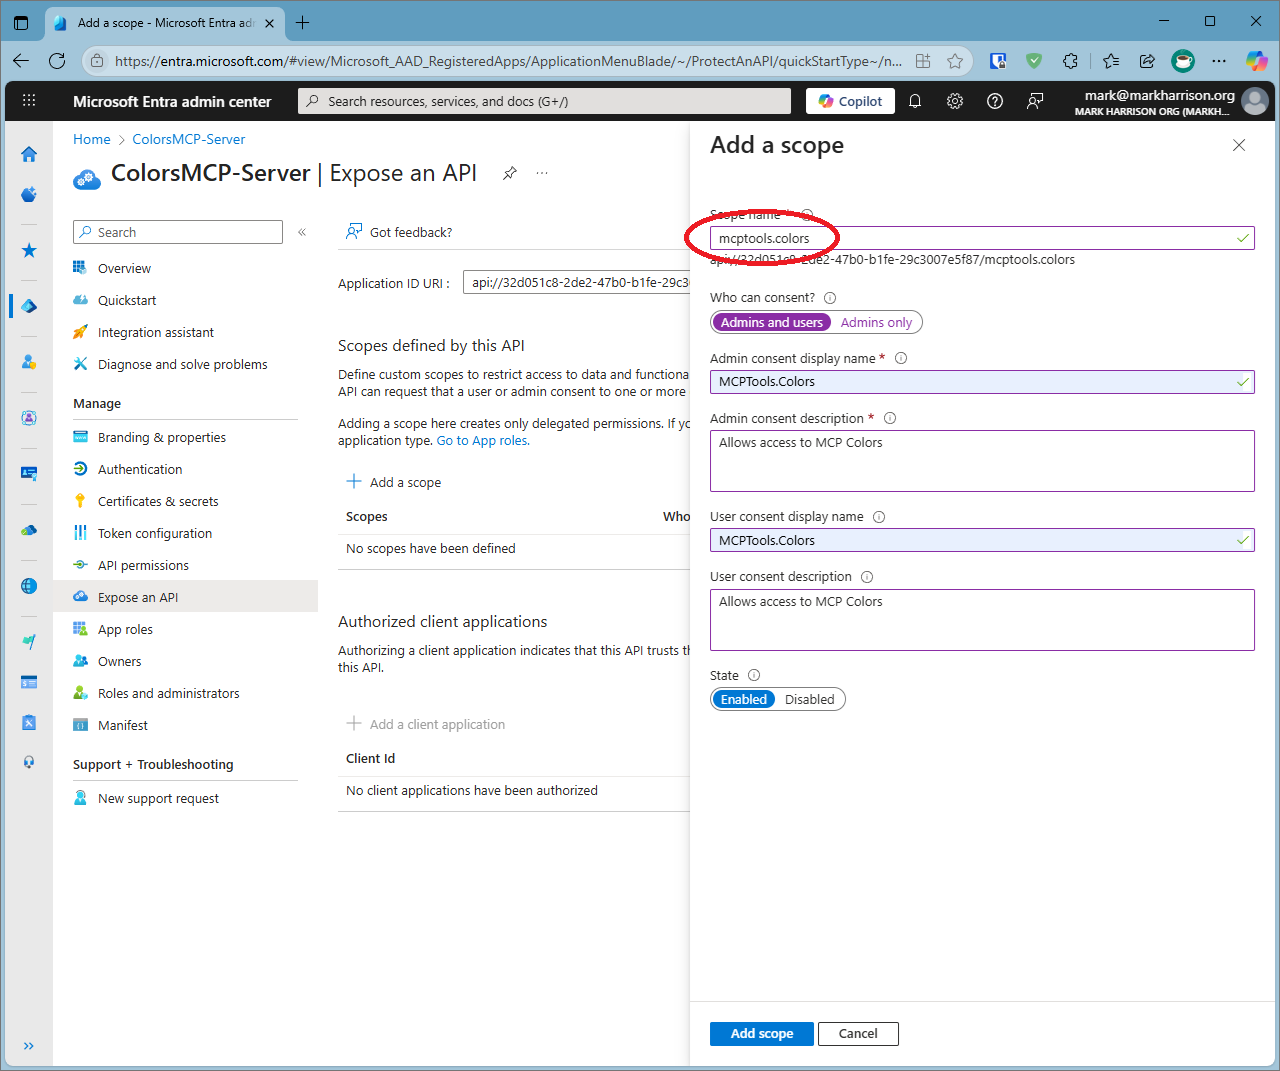
Next click
Add a scopeand enter a value - for example 'mcptools.colors'. The scope value will be needed for our application configuration -
Allow both admins and users consent . This means anyone can grant consent to use the MCP Server.
-
Click
Add scope
Update Application Configuration
We are now ready to update the application's configuration. Below are my example values - be sure to replace them with your own values.
  "ServerUrl": "http://localhost:59254/",
  "TenantId": "95fdb808-f6f3-4abc-9cb2-8a86090ea39a",
  "Audience": "32d051c8-2de2-47b0-b1fe-29c3007e5f87",
  "Scope": "mcptools.colors"
The Server URL is a local address used by Visual Studio. There is a Docker file in the project to build a Docker image / container that makes it easy to deploy the MCP Server to something like Azure App Service.
Configuring Visual Studio
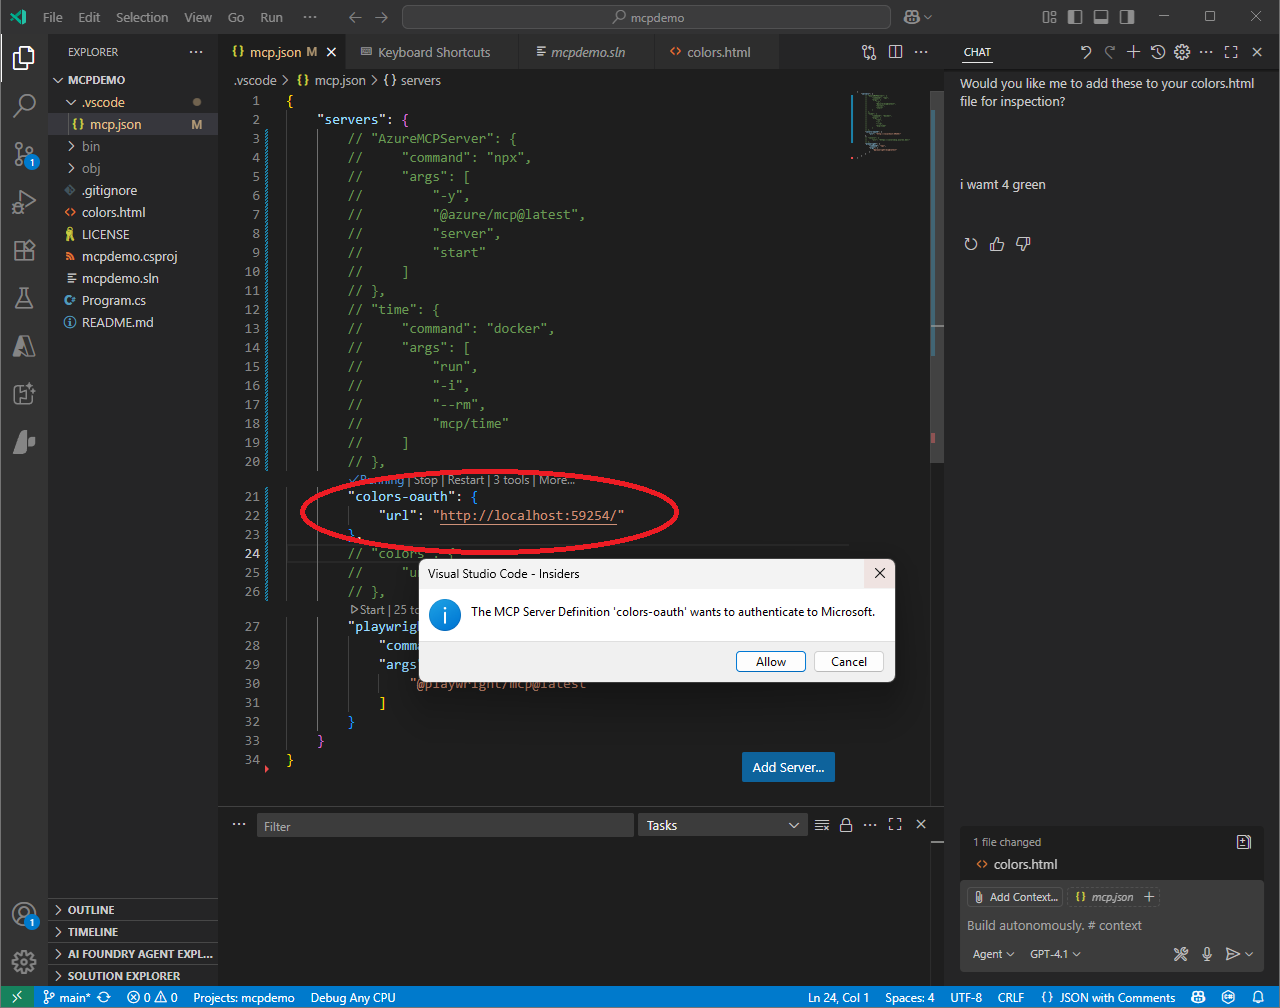
Recapping from an earlier section ... the .vscode\mcp.json file contains the configuration to the MCP Server.
Add the lines with the URL to the MCP Server application
-
Click on the grey link to
Start -
The MCP Server will signal to the MCP Client that the user must authenticate. Click the button to
Allow.
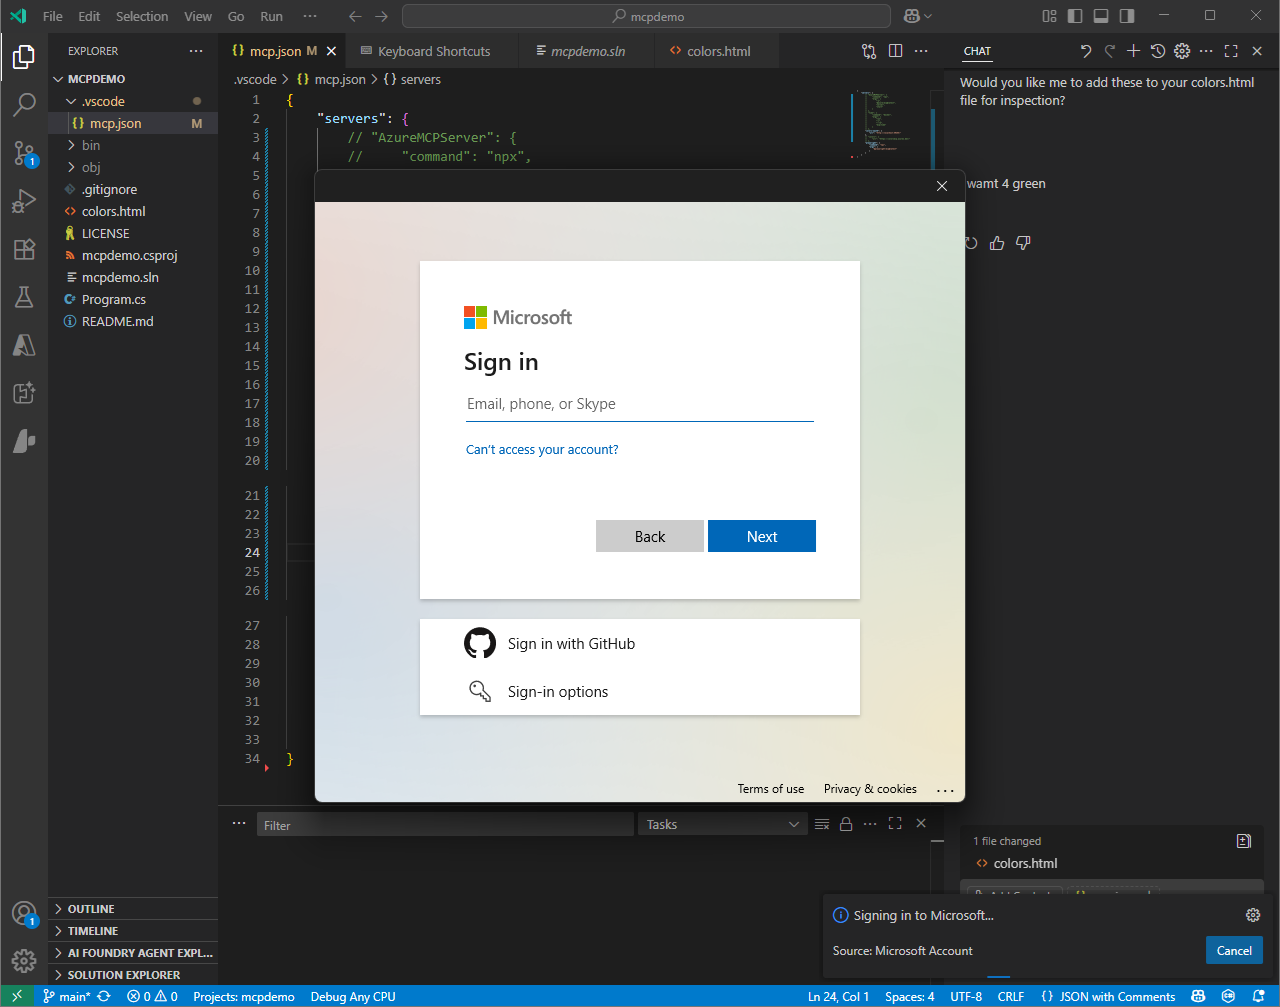
-
We now get prompted with an Entra login screen
-
Enter your user credentials, and do MFA if necessary
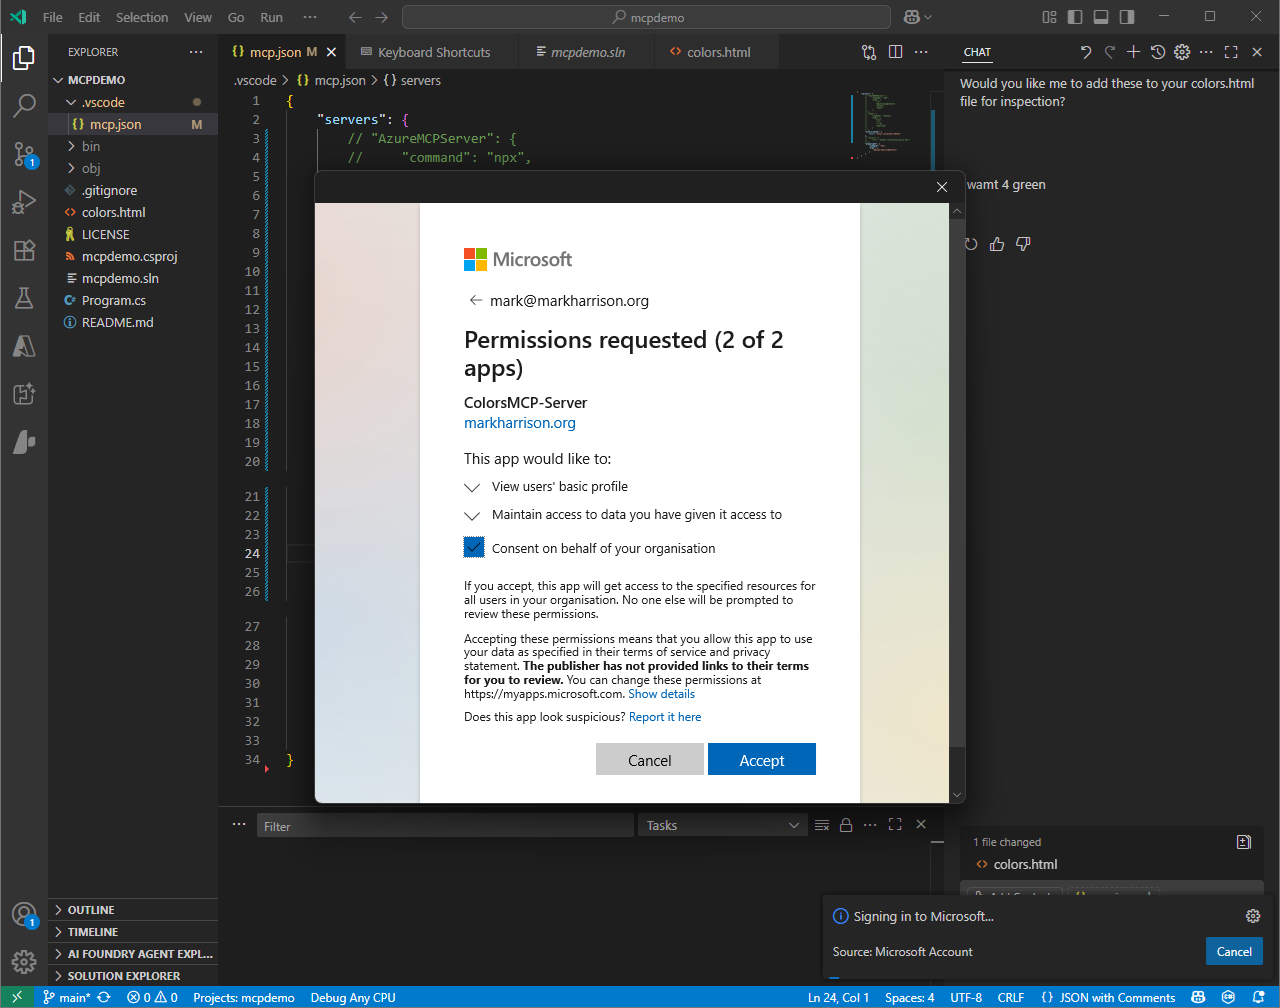
-
When authenticated, a consent screen will be displayed
-
Grant permission for the MCP Server to be used
-
The MCP Server should now show as 'Running'.
-
Looking at the logged in users, we can examine the Trusted MCP Servers
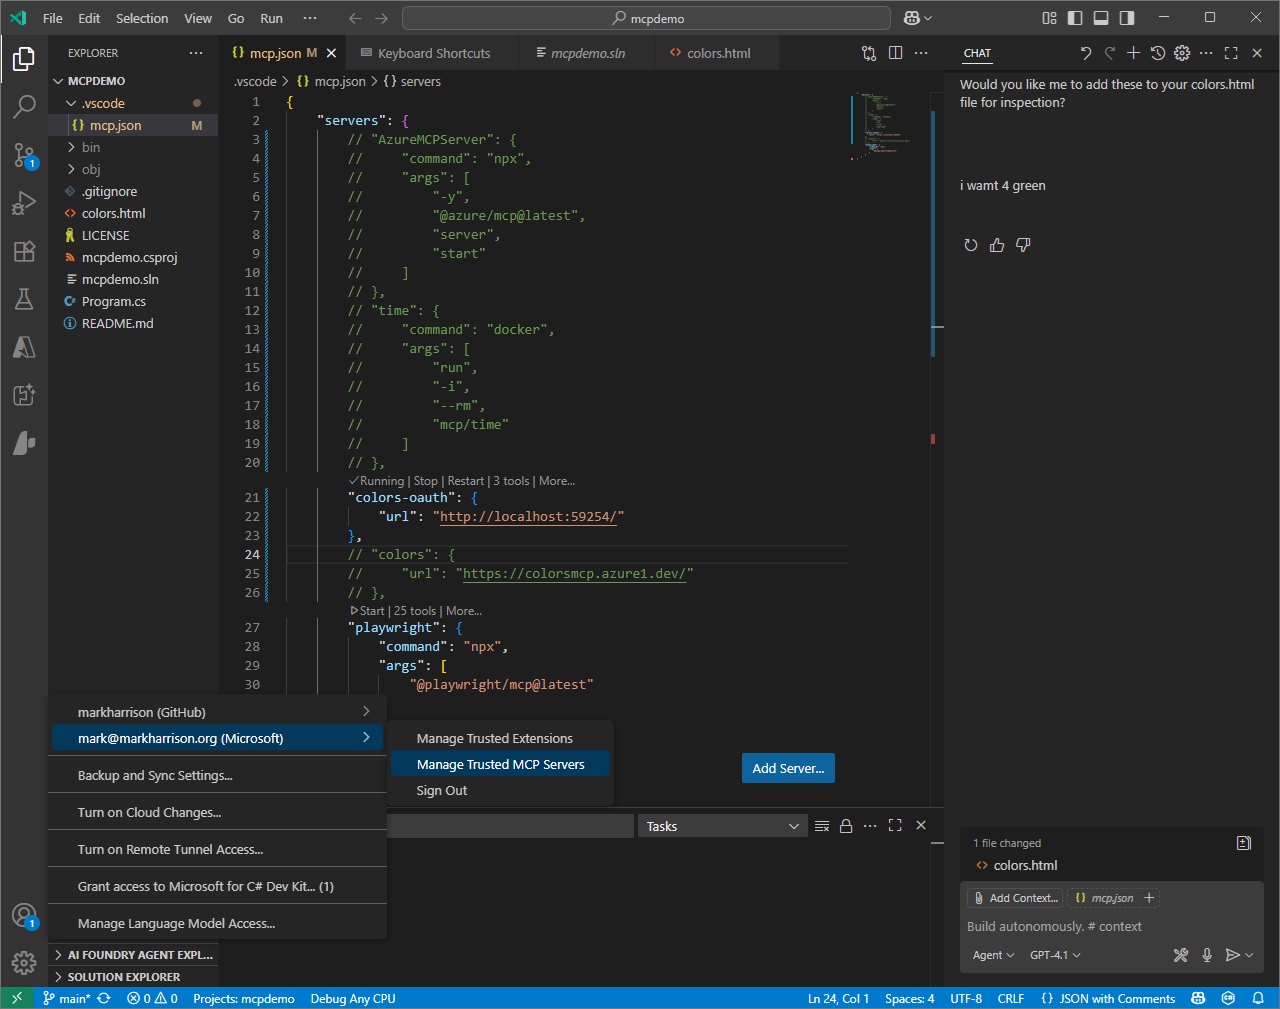
Using the ColorsMCP Server
To call our MCP Server, within GitHub Copilot Agent mode - use a prompt like:
I need a palette of four colors from the green family - plus black ...
   please add to colors.html so I can inspect
Looking at the application's console log - we can see that the token has been validated and the user identified from information stored within the access token.
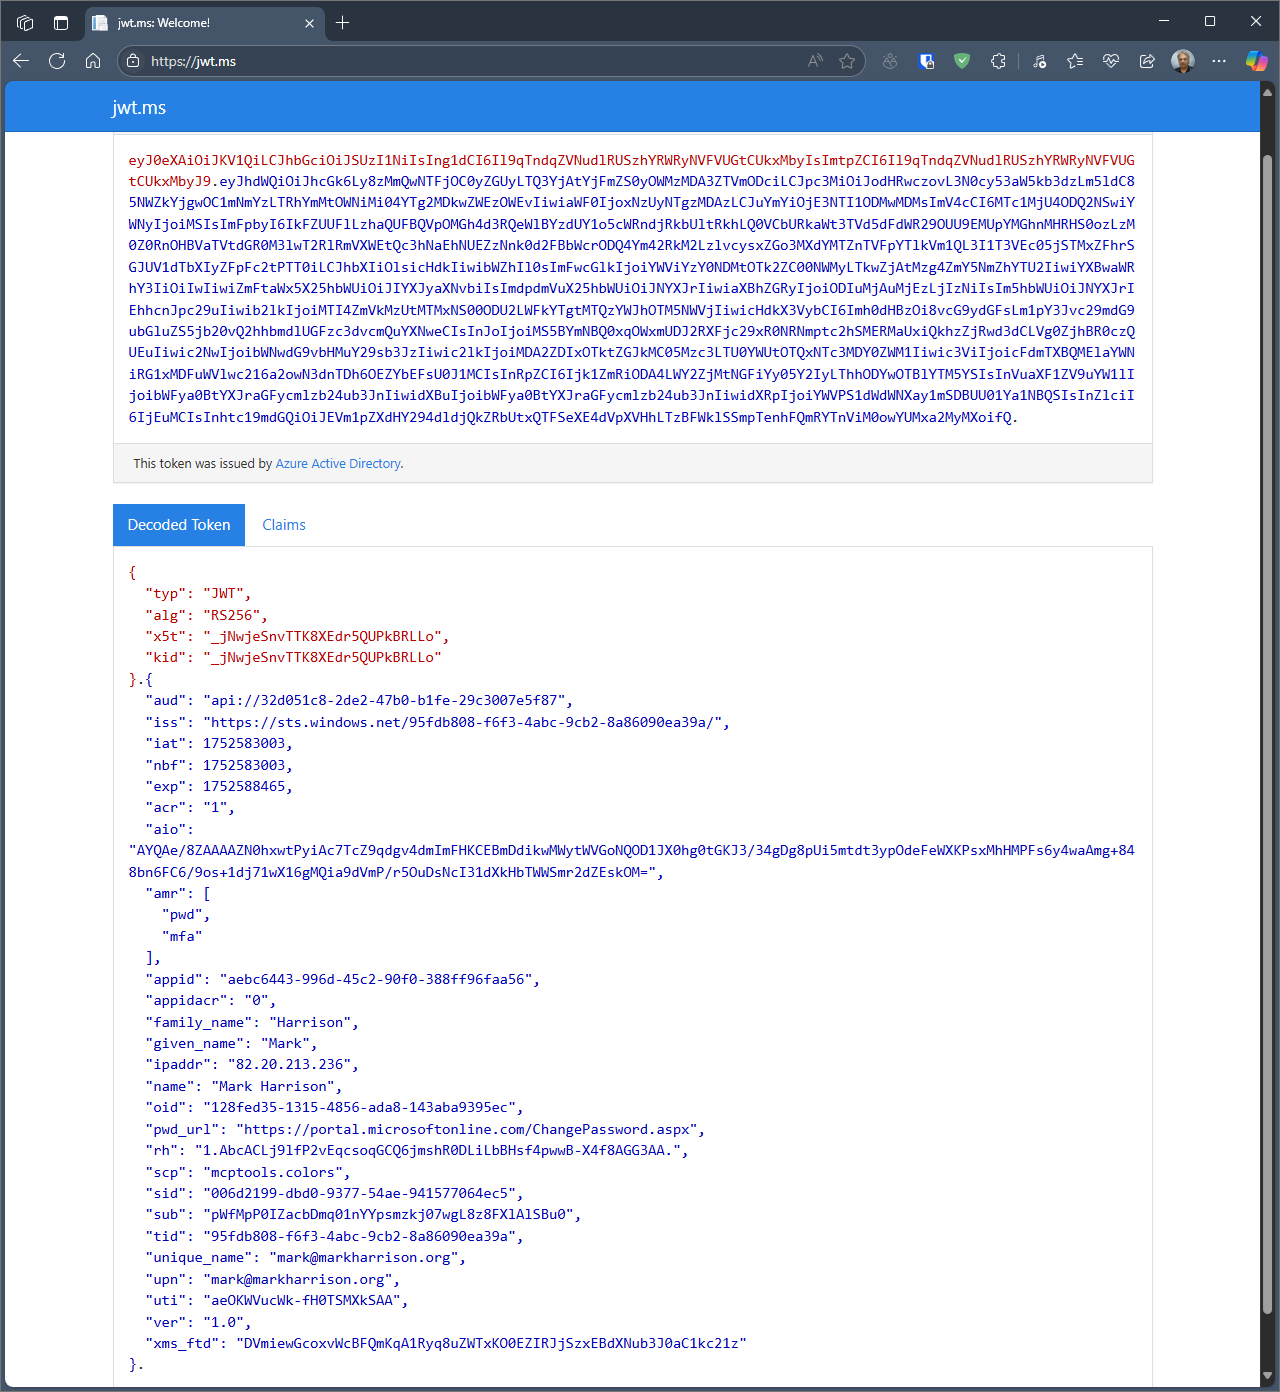
Inspecting the Access Token
In the OnTokenValidated event handler we can add a line to display the access token.
    Console.ForegroundColor = ConsoleColor.Cyan;
    Console.WriteLine($"JWT Token: {context.SecurityToken}");
    Console.ResetColor();

To inspect the contents of the access token - we can use the website https://jws.ms/.
Copy and paste the token from the console log into this web site.
The invididual items within the access token are called claims. We can see the claims about the user, the audience and the scopes.
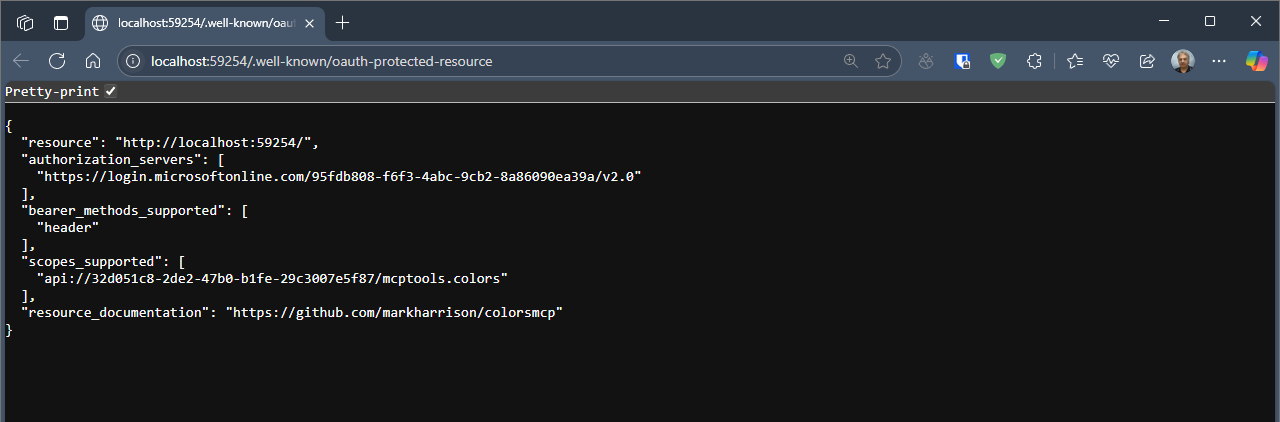
Inspecting the OAuth Protected Resource document
Near the top of the console log, the application displayed the URL of the OAuth Protected Resource document. Check out this address - it gives information for the MCP Client to know how to authenticate e.g. the address of the Entra tenant.
Client App Registration
Normally with OAuth, we also need to create a Client App Registration - which connects to the Server App Registration. But we didn't need to do this ...
If we check Entra we can see an Enterprise App registration for Visual Studio Code.
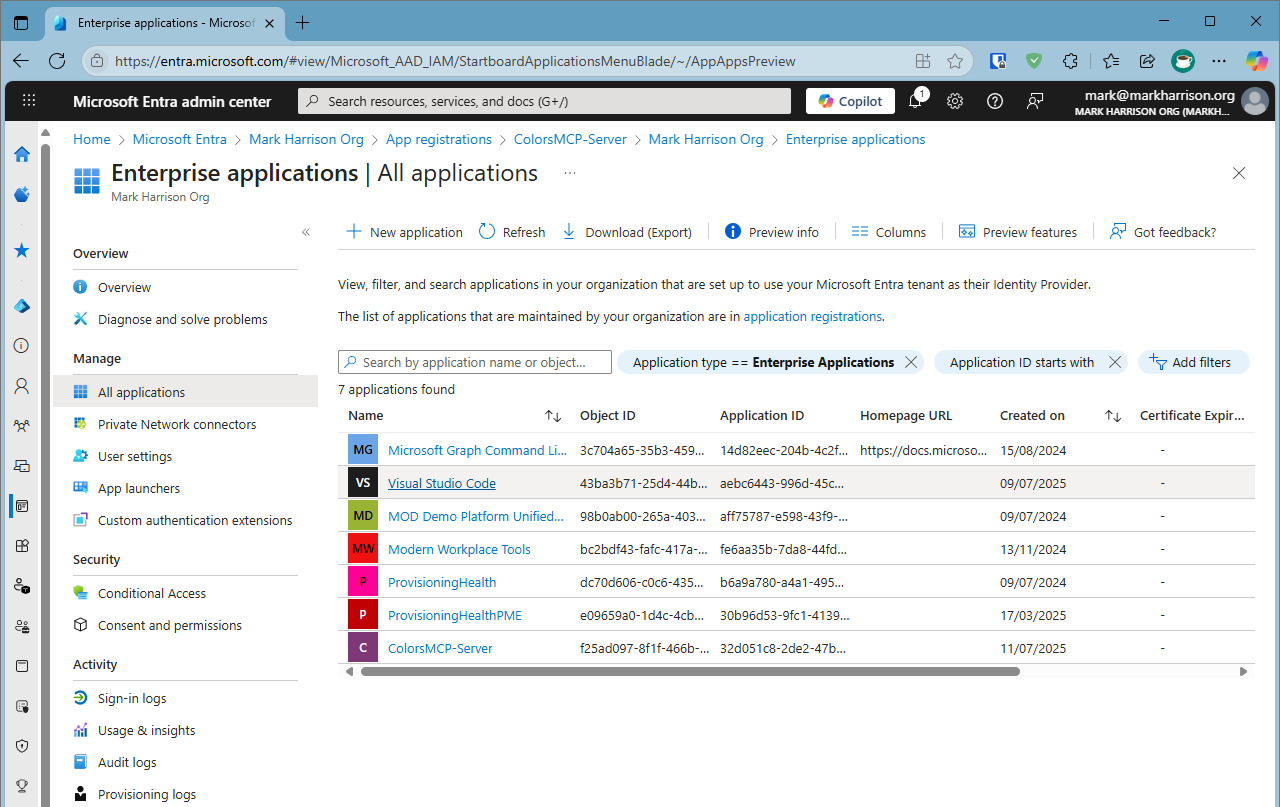
And it has automatically configured the connection to the MCP Server with the 'mcptools.colors' scope.
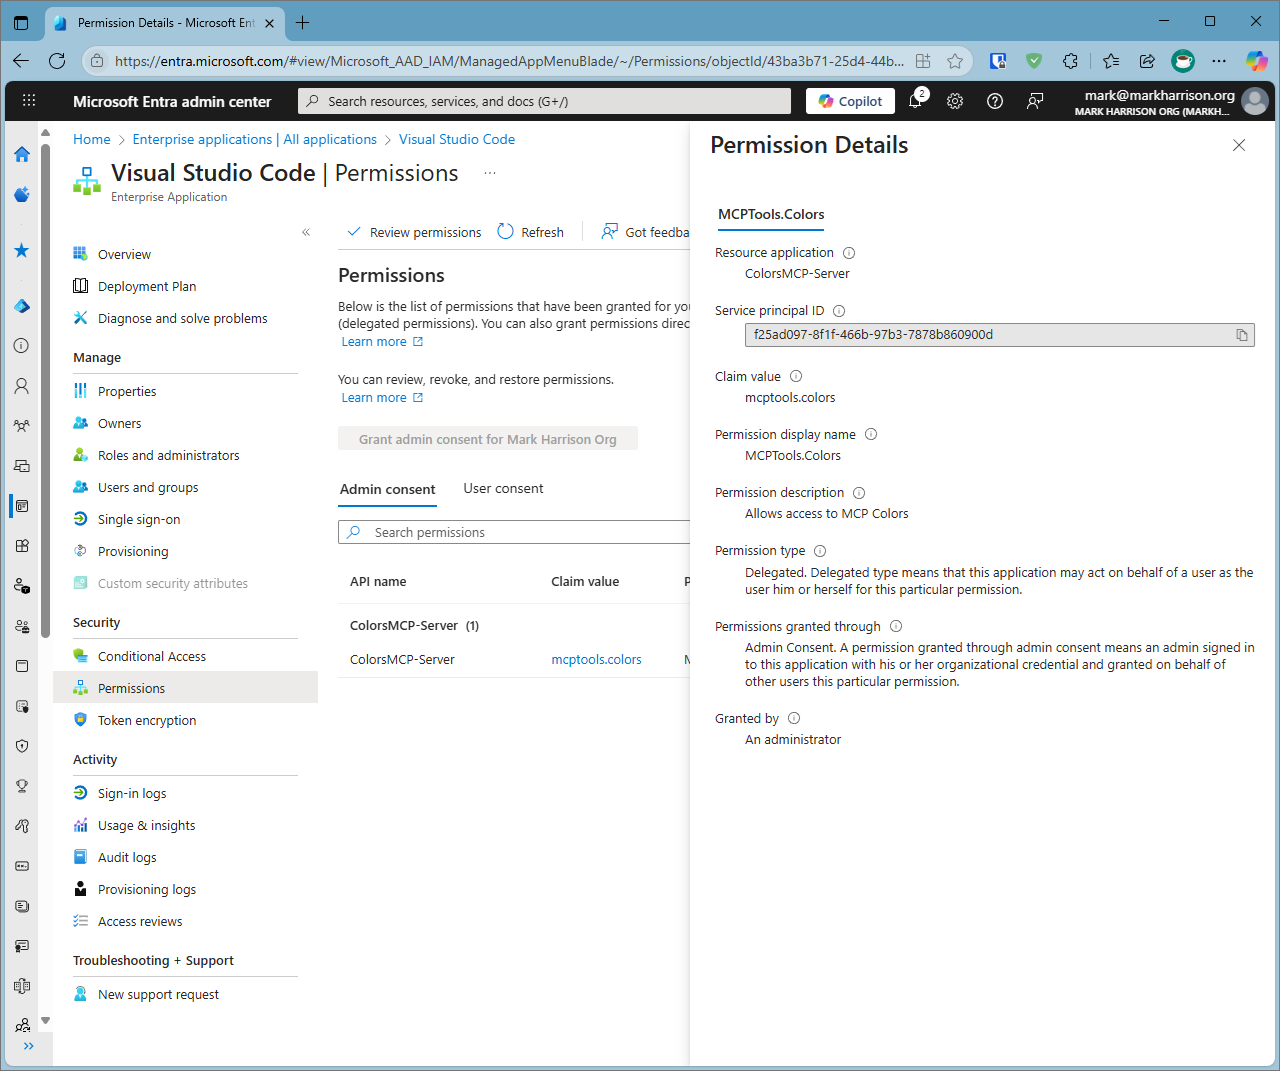
As the number of MCS servers grows, configuration becomes increasingly demanding - so this automated setup reduces the efforts needed while ensuring accurate token issuance, scope management, and validation.